
D.I.Y.Refinishing Hardwood Floors
When you decide to refinish hardwood floors, you'll need time and patience. Check the color you want to refinish. Make sure the floor is at least 3/4" thick. Anything less and it's recommended a professional be called to refinish the floor. There are some supplies you will need to collect before you begin to refinish hardwood floors. You will need to decide on a stain color and a polyurethane floor finish appropriate for your floor, the professionals at your home improvement store should be able to help decide what is best for your floor. It's a good idea to take a few pictures of the room and floor with you, so the professionals can help. While at the home improvement store, you will need some paint brushes, eye goggles, sand paper in three different grits. Make sure it will work with the Orbital Sander you will need to rent or borrow. If you are unable to rent one at your home improvement store, go to a rental supply company and figure out which sand paper will work best. Also, if you have never used a sander before, ask them to show you how to work the sander.

Before you begin, make sure you have all your supplies. You need a orbital sander, sand paper in 3 different grits (20, 60 & 120), a stain, a floor finish, paint brushes, clean rags, eye goggles or protection, duct take and plastic. Some suggest a shop vac to help clean the floors..
When you are ready to start, it's time to prepare the floor. Start by clearing all the furniture and wall hangings from the room. When the room is clean, you need to cover or tape off the outlets, vent ducts and cover any light fixtures. Next, check the floor for any nails, tact's or staples that can be pounded in or pulled out. You want the floor to be as smooth as possible for the best looking refinished hardwood floor. Now you are ready to begin stripping the floor.

Open windows before you begin with a sander. If you have never used a sander before, it's recommended you begin in a closet or a test corner. When you are ready to begin stripping your floor. Use the 20 grit sandpaper and move to the center of the floor. Begin at the center and move your way to the outside of the floor. Be very careful to keep the sander moving. If you stop it will cause gouges in your floor. When you get to the outer wall, use the edging tool. Two tips for sanding your floors is to move with the grain of the wood. Also, if you have gouges or cause one, use long strokes to even those out. Switch to the next grit of sandpaper, usually a 60 grit to smooth out the floor and take care of any minor imperfections. When you are satisfied, us a 120 grit sandpaper to smooth the floor and prep the floor for a stain. When the dust settles, it's time to clean the floor. Do not use water. Use a household
broom or shop vac and really clean the surface.
Now your floor is ready to be stained. In a corner, do a small test. Apply a little stain to a rag and apply. Let that dry for 5 minutes and check it. If you are satisfied with the color, you're ready to begin.
Starting in the furthest corner and working your way out of the room, begin apply the heaviest coat of stain with a brush. Apply the finish going with the grain of the wood. Use long, even strokes when applying the stain. Let the first stain coat dry completely and then apply a second coat. If you have uneven color, pay close attention to your strokes and where your floor needs more work and less work. Let the second coat dry completely.
When the stain is completely dry, it's time to add the polyurethane finish. Do not shake the finish, rather open it and stir the finish. Shaking will add air bubbles with will cause your floor to have air bubbles. Using a clean and dry paint brush, begin applying the polyurethane finish to the floor. Again, start in the furthest corner and move out of the room. Apply the finish going with the grain of the floor. When you are done, read the label and see what dry time is recommended. Then apply the second coat. It's recommended once the final coat of finish is applied to the floor, let the floor dry over night. Professionals recommend you wait 3 days before placing your furniture back in the room.
| tem | Color | Name |
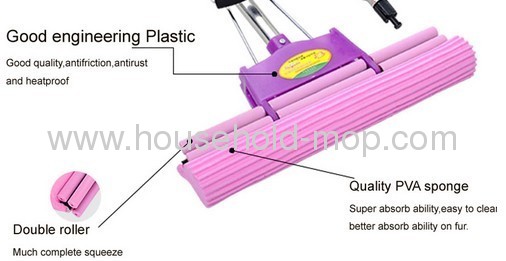
| item | AJP24 | PVA MOP | Spin Mop Pva Mop |
| Product Detail | Mop Pole | Pole Material | Telescopic steel pole with plastic coating |
| Pole handle Material | PP |
| Pole Length(Max,Min) | 130cm;70cm |
| Mop Head | Mop head base material | pva |
| Mop head base size | 40cm*10cm |
| Mop Head Cloth | ClothMaterial | pva |
| Cloth Size | 45cm*15cm |
| Joint(Pole with head) | Joint Style | Inner retracting button |
| Rotating | 360° |
| Joint Material | PP |
| | MOQ | 3000 |
| Packing Detail | Packing Method | 1 PC product include | 20PCS/CTN, Standard Carton Package |
| Export Brown Ctn | 110*32*47CM |
| PCS/CTN | 20 |
| | Loading Weight | N.W/CTN | 14.48kg |
| | G.W/CTN | 16.68kg |
| | Loading Quantity | 20'FT | 7010 |
| 40'FT | 528CTN/ 10,060PCS |
| 40'HQ | 10,560 |
